How to create a new booking manually in ResBook PMS
ResBook PMS defines the Manual booking form as a form/way to enter guest booking information into the ResBook PMS calendar. This approach is useful when taking bookings over the phone or via email.
Step 1: Add a new booking using the Manual Booking Form by choosing one of the below methods:
| 1. Calendar View Selection: Click on the desired date and stock unit in the Calendar availability grid. |
2. Selection on Booking tab: Go to the homepage and hover over the 'Bookings' tab and select [New Booking]. |
3. Shortcut Selection: Go to the homepage and click on the 'plus sign' and select [New Booking]. |
 |
 |
 |
Step 2: Enter Booking Details

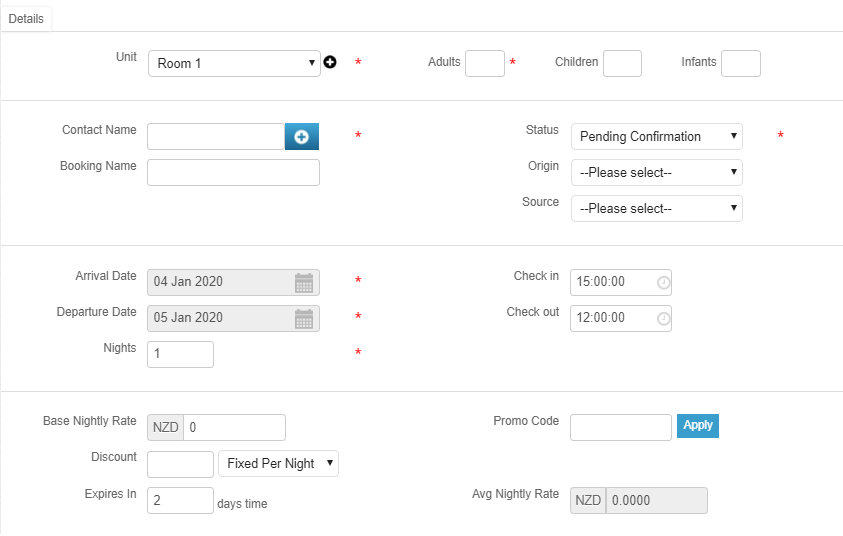
Please note: All fields marked with * are compulsory. Enter the following details to fill in the booking form:
An overview of the details required to complete the manual booking form:
| Field |
Description |
|---|---|
Unit |
Refers to the Stock unit (Room name/Property name) or Classification. As selected by the ResBook PMS user, using the drop-down box. By clicking on the plus sign next to the Unit field, the user can add an additional stock unit to the booking making it a multi-room booking. |
Adults/Children /Infants |
The number of guests to expect in this Booking. |
Contact Name |
The user is required to create a new contact or search and assign a contact that already exists by typing the first three letters of a guest name. |
Booking Name |
User-defined field to identify the Reservation or Actual guest occupying the unit if it is different from the contact/company/booking agent. |
Status |
User-defined field to identify the status of the Reservation. Use the drop-down box to change selection. |
Arrival Date/Departure Date |
The arrival date is the date the guest will be arriving at the property. The departure date is the date they will be leaving the property. |
Nights |
Indicates the number of nights guest(s) will be staying. |
Check-in/Check-out |
These fields will automatically populate pertaining to the settings under [General Settings]. Any check-in/out time set on the stock unit level will not apply to the manual booking form. |
Base Nightly Rate |
This will automatically populate on the screen depending on the rate set for the stock unit. |
Promo Code |
This can be applied provided that the Promo code is already created and you subscribed to the Promo codes module. |
Discount |
Discount can be applied based on Fixed amount or percentage deduction on the nightly rate. |
Average Nightly Rate |
This field will automatically populate by calculating the total rate of the booking and averaging it out by the number of nights. |
Step 3: Collect Additional Information
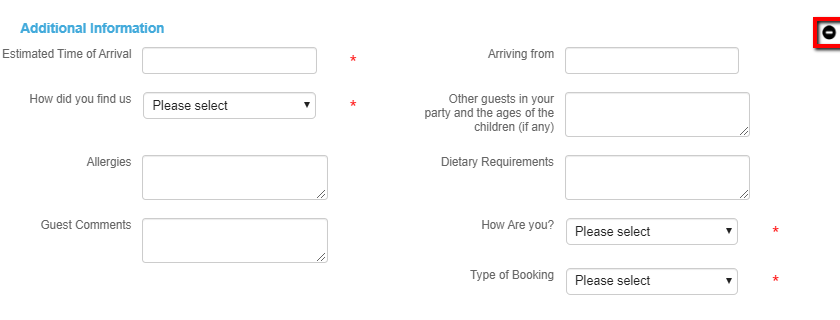
- Here you can add additional information to the booking by clicking the [plus sign]. These include details such as 'Estimated Time of Arrival', 'Allergies', and 'Dietary Requirements'. If you have added any additional fields into your booking form from the [System settings] and [Booking Forms], then they will appear here under the 'Additional Information' section of the booking form.
- If you have labeled any of these fields as required, then the * will appear next to the field, and you will be required to fill these fields out before you can save the booking.

Step 4: Enter Any Notes and Comments
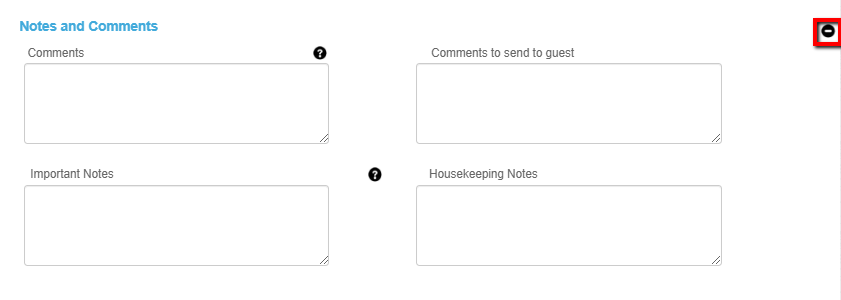
- Notes and comments can also be included in the Booking details by clicking the [plus sign]. Anything entered into 'Important Notes' will be found on the calendar availability grid when you:
- Old calendar user: hover over the Booking
- New calendar user: click on the Booking
- Agenda user: open the Booking and view the information in the Manual Booking form itself

Step 5: Add an Agent
- To add an agent to the booking, click the [plus sign]. Then use the drop-down box to assign an agent to the booking.
- An agent can only be assigned to the booking if they have been created as a contact in the CRM. If you have not already, head to Add Agent Contact.
- The commission level is prepopulated with the information from the Agent contact, however, it can be overridden in the Manual booking form to any desired value.

Step 6: Finalise the Manual Booking form using one of the below options:
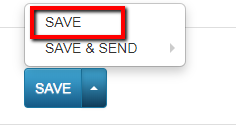
- Once the above additions are entered and the form is saved, the booking form will capture the data accordingly. Scroll down to [SAVE] and select [SAVE] again.

- Click on [SAVE] and then [SAVE & SEND] if you would like to send out an email to the guest from one of the appropriate email templates, for example 'Adding a Reservation (Confirmed)'. Once the template has been sent, the Booking will be saved automatically.

Please Note: You must ensure all email templates are filled in and activated.

