
The main dufference between using the Heading and Template options to create a CTA Button is their styling:

![]()

CTA Button using Template > Button-Primary CTA Button using Heading > Button
In this guide we will cover:
- Adding a CTA Button using the Heading option within the Rich Text Editor
(for websites built after 2019)
-
Add a PDF to sit behind a CTA Button
- Add a link to another page to sit behind a CTA Button
- Add a CTA Button for people to send you an email
-
- Adding a CTA Button using the Templates option within the Rich Text Editor
(for websites built after 2019)
- Add a PDF to sit behind a CTA Button
- Add a link to another page to sit behind a CTA Button
- Add a CTA Button for people to send you an email
-
Adding a CTA Button to a Page (for websites built prior to 2019)
Adding a CTA Button using the Heading option within the Rich Text Editor (for websites built after 2019)
Add a PDF to sit behind a CTA Button
-
Login to the CMS using your Username and Password, then navigate to the General Menu and Select Pages. Select the name of the page you would like to work with to open it. Let's work with the Weddings Page, nested under the Parent Page of Occasions, as an example and add a downloadable wedding guide to the page.


- In the Content tab, add some text e.g.: DOWNLOAD OUR WEDDING PACK which we are then going to highlight to become a hyperlink. A visitor to the page will then click on the link which will open the wedding pack as a PDF.

- With the text highlighted, select the Folder icon (
 ) in the toolbar.
- Selecting the folder icon will open File Manager, allowing you to choose a PDF that will sit behind this text as a link. You can also upload a PDF file to File Manager at this time the same way you add images to File Manager. Once the file you need has uploaded, select the PDF until the file turns blue, then select Choose at the top left of the window.

- You'll notice that the highlight text has now turned blue, confirming that you have successfully linked the document to this text.
- You can now select Save at the top left of the page to publish your changes, and view these on the front end.

- This will show on the front end as underlined text.

- As you are not able to copy a URL for the PDF file from File Manager, you will need to go to the front end and click on the underlined text to open the PDF and copy the link. Make sure that you only copy the URL from https:// onwards, as when a PDF opens Adobe Acrobat in Chrome for example the URL will be much longer. e.g.: chrome-extension://efaidnbmnnnibpcajpcglclefindmkaj/https://inspiretheme.tomahawk.co.nz/library/files/pdf-test/Wedding-Pack.pdf
- Navigate back to the General Menu and Select Pages, then open the page you have been working on. Highlight the text again, and select the Link icon (
 ) to open a pop-up where you will paste in the URL for the PDF, then toggle on Open in a new tab until the toggle turns green. Select the green tick button to save your changes.
- The last step is update the text from being hyperlinked, to a CTA button. Highlight the text again, this time select the Button option from the Heading menu.

- You can now select Save at the top left of the page to publish your changes, and view these on the front end.

Add a link to another page to sit behind a CTA Button
- Login to the CMS using your Username and Password, navigate to the General section of the website, then select Pages. Select the name of the page you would like to work with to open it. Let's work with the Weddings Page, nested under the Parent Page of Occasions, as an example and add a CTA Button to navigate a visitor to the page to our Gallery Page to view photos of the venue.
- Navigate to the Content tab and the section that contains a Rich Text Editor, add some text e.g.: VIEW OUR GALLERY which we are then going to highlight to become a hyperlink. A visitor to the page will then click on the link which will take them to the Gallery Page to view images of the venue. You will see a toolbar at the top of this section that contains a Link icon [🔗], with the text highlighted select the Link button. This will open a pop-up with a field for you to enter the URL for the Gallery Page.
- You will need to go to the front end and navigate to the Gallery Page, and copy this URL from your browser. You can now paste this into the Link URL field, and select the green tick icon [✔] to save your changes.

Note: If you are directing visitors to the page to an internal page within your website, you do not need to toggle the Open in a new tab to the on position. - The text will now change to a blue colour to confirm that this text has now been hyperlinked.

- The last step is update the text from being hyperlinked to a CTA button. To do this, highlight the text and select the drop-down arrow on the option for Headings. Scroll down until you see the option for Button, and select this.

- When you have finished making edits to the page, select the Save button at the top of the page and you will be directed back to the Pages menu.
- This will show on the front end as a coloured CTA button with your text inside. There are options within the Rich Text Editor to help your CTA Button stand out more, you can read more about all text formatting options in The Content tab section on our guide on How to create a new page.
In the example below you can see formatting options such as making the text bold, and centre aligning the button.
- The final step is to select the CTA Button to make sure that you are being directed to the Gallery Page.
Add a CTA Button for people to send you an email
- Login to the CMS using your Username and Password, navigate to the General section of the website, then select Pages. Select the name of the page you would like to work with to open it. Let's work with the Weddings Page, nested under the Parent Page of Occasions, as an example and add a CTA Button that when clicked will open a new email populated with your email address.
- Navigate to the Content tab and the section that contains a Rich Text Editor, add some text e.g.: GET IN TOUCH. You will see a toolbar at the top of this section that contains a link icon [🔗], with the text highlighted select the Link button. This will open a pop-up with a field for you to enter a URL.

- Type or paste in mailto: then an email address e.g.: mailto:clientservices@tomahawk.co.nz Make sure that there are no spaces. Then select the green tick icon [✔] to save your changes. You won't be able to add in an email subject or body text.
- The last step is update the text from being hyperlinked text to a CTA button. To do this, highlight the text and select the drop-down arrow on the option for Headings. Scroll down until you see the option for Button, and select this.

- When you have finished making edits to the page, select the Save button at the top of the page and you will be directed back to the Pages menu.
- Always check the website's front end once you have saved your changes to make sure the link appears and when clicked, opens a new email, and the email is received in the set inbox.

Adding a CTA Button using the Templates option within the Rich Text Editor (for websites built after 2019)
Add a PDF to sit behind a CTA Button
-
Login to the CMS using your Username and Password, then navigate to the General Menu and Select Pages. Select the name of the page you would like to work with to open it. Let's work with the Weddings Page, nested under the Parent Page of Occasions, as an example and add a downloadable wedding guide to the page.
- In the Content tab, select the Insert Template icon (
 ) in the toolbar.
- You'll be presented with a list of templates to choose from. Scroll down the list and select Button-Primary. There is also an option for a different coloured CTA Button under Button-Secondary.

- This will populate the Rich Text Editor with a CTA Button. Highlight the Update Link text to update this to DOWNLOAD OUR WEDDING PACK

- We are now going to highlight the text, and select the Inset File folder icon (
 ) from the toolbar to open File Manager and select a PDF document.
- This will allow you to choose a PDF that has already been saved to File Manager toll sit behind this text. You can also upload a PDF file to File Manager at this time the same way you add images to File Manager. Once the file you need has uploaded, select the PDF until the file turns blue, then select Choose at the top left of the window.
- You can now select Save at the top left of the page to publish your changes, and view these on the front end.

- A visitor to the page will then click on the link which will open the wedding pack as a PDF.

Add a link to another page to sit behind a CTA Button
-
Login to the CMS using your Username and Password, then navigate to the General Menu and Select Pages. Select the name of the page you would like to work with to open it. Let's work with the Weddings Page, nested under the Parent Page of Occasions, as an example, and add a link to another page on the website .
- In the Content tab, click into the Rich Text Editor and select the Insert Template icon () in the toolbar.
- You'll be presented with a list of templates to choose from. Scroll down the list and select Button-Primary. There is also an option for a different coloured CTA Button under Button-Secondary.
- This will populate the Rich Text Editor with a CTA Button.
- Highlight the Update Link text and change this to CONTACT US, where we will link people to our contact details to get in touch should they wish to make an enquiry.

- Highlight the text again, and select Link icon [🔗]. This will open a pop-up with a field for you to enter the URL for the Contact Us Page.

- Copy the URL for the Contact Us page from the front end and paste in to the Link URL field. Then select the green tick icon [✔] to save your changes.

- You can now select Save at the top left of the page to publish your changes, and view these on the front end.
- This will show on the front end as a coloured CTA button with your text inside. There are options within the Rich Text Editor to help your CTA Button stand out more, you can read more about all text formatting options in The Content tab section on our guide on How to create a new page.
In the example below you can see formatting options to centre aligning the button.
- Always check the website's front end once you have saved your changes to make sure the link points to the correct page you have set.
Add a CTA Button for people to send you an email
- Login to the CMS using your Username and Password, navigate to the General section of the website, then select Pages. Select the name of the page you would like to work with to open it. Let's work with the Weddings Page, nested under the Parent Page of Occasions, as an example and add a CTA Button that when clicked will open a new email populated with your email address.
- In the Content tab, click into the Rich Text Editor and select the Insert Template icon () in the toolbar.
- You'll be presented with a list of templates to choose from. Scroll down the list and select Button-Primary. There is also an option for a different coloured CTA Button under Button-Secondary.
- This will populate the Rich Text Editor with a CTA Button.
- Highlight the Update Link text and change this to GET A QUOTE, you will see a toolbar at the top of this section that contains a link icon [🔗], with the text highlighted select the Link button. This will open a pop-up with a field for you to enter a URL.

- Type or paste in mailto: then an email address e.g.: mailto:clientservices@tomahawk.co.nz Make sure that there are no spaces. Then select the green tick icon [✔] to save your changes. You won't be able to add in an email subject or body text.

- When you have finished making edits to the page, select the Save button at the top of the page and you will be directed back to the Pages menu.
- Always check the website's front end once you have saved your changes to make sure the link appears and when clicked, opens a new email, and the email is received in the set inbox.

Adding a CTA Button to a Page (for websites built prior to 2019)
Not all websites built prior to 2019 have button functionality. The best way to find out, is to complete the below, and check the front end of the website to see if the button shows.
- Go to a button on a page, that you are going to copy the code from
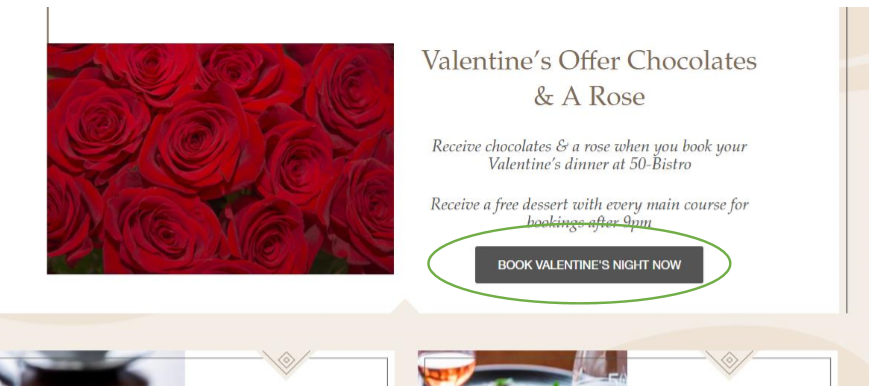
- Right click on the button, and select inspect

- You will see the code for that button highlighted - copy this by right clicking, selecting copy>copy element
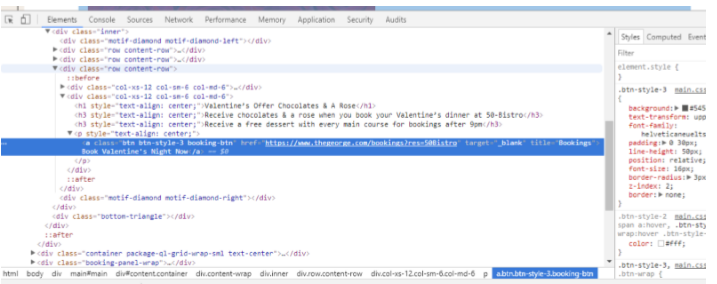
TIP: If the site is live, practice on a page that isn't used often (e.g. the 404 error page) before proceeding to adding the button onto your page. - In the CMS, go into the page you would like your button to be on. Click into the content box, where you want to add the button. Paste the code into the content box, source tab (far left). If you want to change the name of the button, look at the code, and find the old name of the button that you copied, and replace it with your new button label.
(This is at the end of the text: target="_blank" title="Bookings">Book Valentine's Night Now</a></p>)
If you want to create the button to go to a document
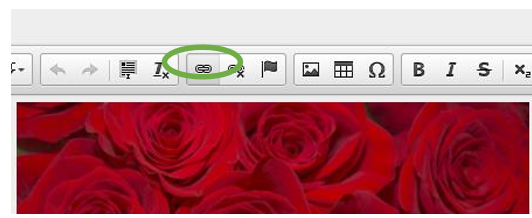
- In the toolbar, highlight the text to add in the URL for the link. In the link pop-up box, click the button for ‘Browse Server’. This takes you to your File Manager to select the file. You can then double click on the PDF file to select it, then click OK.
- Select Save at the top of the page to save your changes, and review the front-end to test your newly created button.
If you want to add a button that goes to another URL (e.g.: to your contact us page)
Similar to creating a button that opens a PDF, instead of clicking ‘Browse Server’, enter the URL address you want the button to go to (e.g. www.thegeorge.com/contact-us).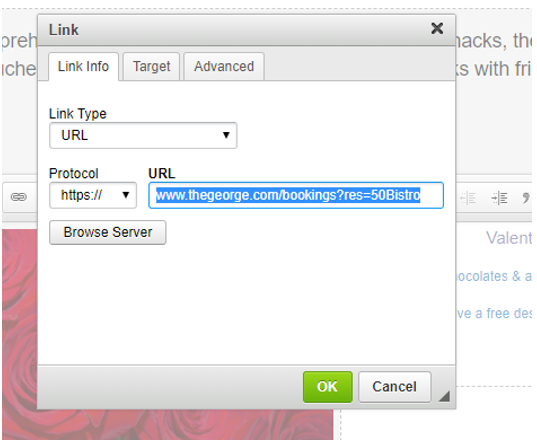
If you want to have the button open an email box:
Follow the same steps as above, adding the code into the source box and clicking OK
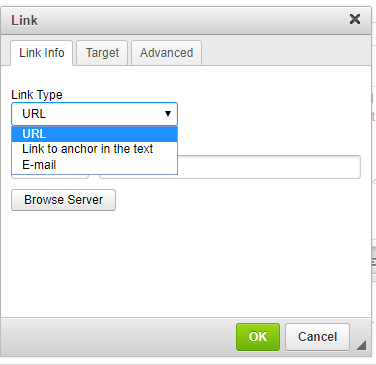
- Now highlight the text in the content box and click the link icon in the toolbar. The Link Popup box will appear. In the 'Link Type' box, click the dropdown and select 'Email'
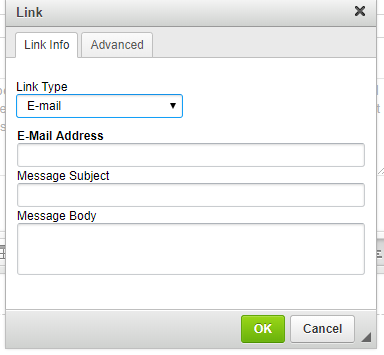
- Now fill in the relevant Email Address, Message Subject (and Message Body if you'd like to)
- Then click OK and publish your page
Making hyperlinks open in a new tab
To make hyperlinks open in a new page, go to the page you want to edit the hyperlink in your CMS and highlight the text that has the link added to it. Click the link icon in the toolbar and go to the 'Target' tab. Click 'New Window', so the link opens the link in a new window rather than replacing your website with another URL. 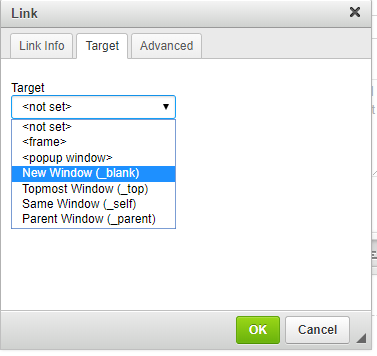

💡 Things to Remember:
-
You have two options to create a CTA Button using either the Heading option, or using the Primary or Secondary Button options in under Templates.
-
When you are adding a PDF from File Manager to sit behind a CTA Button, remember that you will need to follow the steps to create a Hyperlink first and publish this, so that you can copy the URL to use in the URL field. You will then update the hyperlinked text to a CAT Button.
- Make sure that you only copy the website URL from http onwards, as when a PDF opens Adobe Acrobat in Chrome for example the URL will be much longer. e.g.: chrome-extension://efaidnbmnnnibpcajpcglclefindmkaj/https://inspiretheme.tomahawk.co.nz/library/files/pdf-test/Wedding-Pack.pdf