How to add ResBook PMS's direct online guest booking calendar to your website?
To add allow guests to book directly online on your website you need to integrate the ResBook PMS guest booking calendar onto your website
- First you will need choose the setting for your website integration
- Second you will need to integrate the calendar to the website
1. System Settings: Website Integration
Website Integration settings allow you to modify the ResBook PMS website guest booking calendar and forms so you can customise your guest's booking experience.
To access the 'Website Integration' page, click on Settings (the gear icon), then select [System Settings] and find [Website Integration].
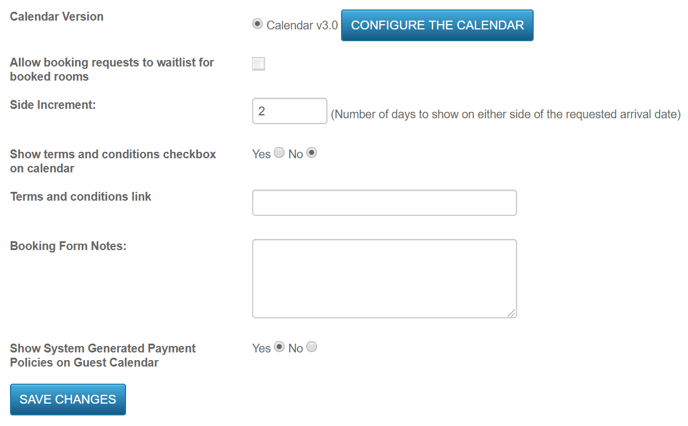
This page will then appear: 
| Calendar Version |
Customise the look of the calendar by clicking on [Configure The Calendar]. |
Allow booking requests to the waitlist for booked rooms |
This allows New Request bookings to be waitlisted for already booked rooms. |
| Side Increment |
A minimum of 6 days will be shown on the calendar + 3 days thereafter at a default. This setting allows you to increase the number of days, provided that your iFrame calendar can fit on your webpage. |
Show Terms and Conditions checkbox on Calendar |
This will show an "Accept Terms and Conditions" checkbox at the bottom of the calendar that a guest must tick before proceeding to the booking forms. |
Terms and Conditions Link |
If you select 'Yes' on the Terms and Conditions checkbox, please provide your website link with these terms and conditions. |
| Booking Form Notes | These notes are included in the Booking and Payment Policy of the ResBook PMS Calendar and will be placed at top of the popup in bold lettering. |
Show System Generated Payment Policies on Guest Calendar |
Check 'Yes' if you want Payment Policies to appear on the Booking Calendar. |
2. Integrating the ResBook PMS Guest Booking Calendar on your Website
To take real-time bookings, ResBook PMS allows you to add the booking calendar to your website. Before doing so, the following requirements must be met:
- Email Templates are set up and activated
- Your payment options have been set up in Accounting and Financial Settings
- If you opted in for a payment gateway, this is live and able to take credit card transactions.
Option 1. Standard Calendar – New Window
This option simply lets your web designer add the link to your ResBook PMS calendar onto your website, it will open out to a new window.
The URL for the link is:
https://www.resbook.net/calendar/?pid=2019&referrer=&mobile=on&availability=show

The ID marked in Red is interchangeable. To find out what your ResBook PMS ID is, log into ResBook PMS and scroll down to the lower left in this ResBook PMS account:

Option 2. iframe Calendar
This option allows you to integrate the calendar into your website so that availability will be visible on your calendar.
NOTE: Please change the PID value 1234 in the below ResBook PMS link with your PID to start seeing your calendar.
<iframe width="100%" height="500" src="https://www.resbook.net/calendar/?pid=1234&mobile=on&availability=show&iframe=1" frameborder="0" scrolling="NO" marginwidth="0" marginHeight="0" vspace="0" hspace="0" allowTransparency="true" sandbox="allow-popups allow-same-origin allow-scripts allow-top-navigation allow-forms" seamless="seamless"></iframe>
Note: if you wish to determine where the calendar sits on your website, either center or left – it is handled by “¢er=true”. For left-aligned, your developer should alter from a ‘true’ to ‘false’.
