Using ResOnline with ResBook (4) | How To Connect ResOnline To ResBook PMS
We are now ready to connect ResOnline to ResBook PMS. We recommend having your ResOnline in a separate tab/window, whilst having ResBook PMS open in the other.
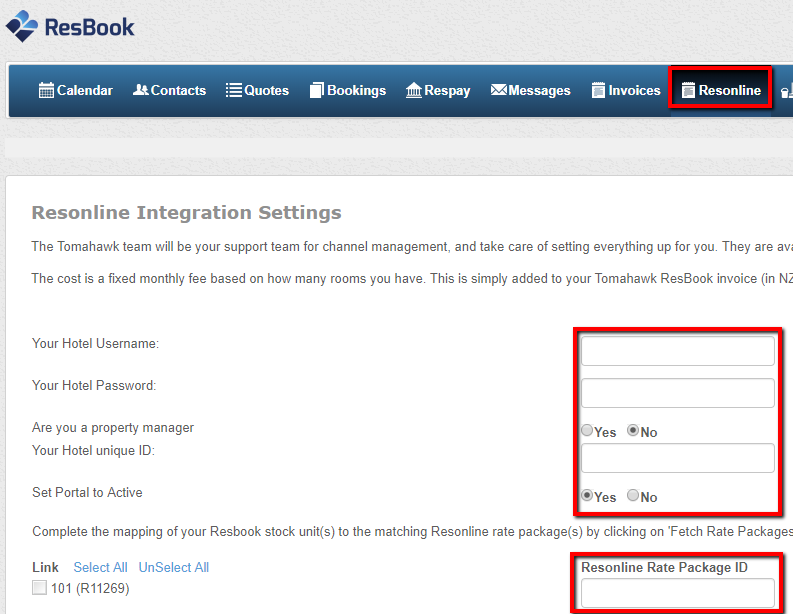
Open up ResBook PMS and log in. From there you will need to go to 'ResOnline > Settings'.
The first thing you will need to do here enters your ResOnline Username, Password, and ResOnline ID into the fields available.

Once you have entered in those details, change 'Set Portal to Active' from 'No' to 'Yes'.
You now need to scroll down to the bottom of the page and click the [Save Changes] button before continuing.
Now we have to attach the Rate Package we created in the last step to a stock unit of your choosing. To do this, scroll down to the list of all the stock units and click 'Fetch Rate Packages' on the right-hand side of the stock unit you choose.

You will now get to decide which Rate Package you wish to attach to the chosen stock unit. We recommend that you name your Rate Package the same as the Stock Unit you wish to attach it too as it will make it easier to track.
When the popup menu appears, just tick the Rate Package you desire and then click [Insert].
Once the Rate Package ID has been inserted, make sure to click the tick box next to your chosen stock unit to ensure that ResBook PMS will push the stock unit when we update the inventory. But for now, simply check the tick box and then scroll down and click [Save Changes].

We are now ready to do the connection to ResOnline. To connect your chosen stock units, scroll down right to the bottom of the page and click on the button [Update Inventory On ResOnline Now].

This will push the stock units you have chosen to ResOnline against the Rate Package you have selected. If you have chosen to set Rates in ResBook PMS rather than in ResOnline, be sure to click on the [Update Rates On ResOnline Now] button afterward.
You have now completed connecting ResOnline with ResBook PMS. However, we now need to connect your ResOnline account to your different channels.
Click here to go to Part 5: Connecting ResOnline To Your Various Channels
