Guest Bookin Form Settings | ResBook PMS
The Guest Booking Form settings allow you to control the way you accept guest bookings from your website.
To access 'Guest Booking Form Settings', click on Settings (the gear icon), then select [System Settings] and scroll to find [Booking Forms] and select [Guest Form].

Guest Form Settings
|
Step 1: Instant Confirmation
|
 If "On" the guest can create a confirmed Booking from your website.
If "Off" then all bookings will come through as a "New Request" and you will need to either confirm or cancel the booking to adjust the availability
|
|
Step 2: Collect Payment Details
|
 Tick the box if you wish to collect payment details. This should only be active if a Payment Gateway (Windcave/PayPal) is linked to ResBook PMS .
Due to new Credit Card security rules, ResBook PMS is not compliant to store credit card details and utilises a payment gateway to achieve this. |
|
Step 3: Instant confirmation not available within "X" days from arrival date
|
 This setting will be visible if "Instant Confirmation" is ON. This will restrict a guest from creating a Confirmed Booking within the specified number of days before arrival. It will not block the guest from placing a "New request" booking. The reasoning behind this is to allow you the time to prepare the inventory before the guest arrives. |
You can customise the Guest Booking Form to your liking. You have several options including Logo and Banner images, Colour selection for backgrounds, text, and headings; and the choice of different fonts you want on the booking form.
To Customize the Guest Booking Form click on [Customise Booking Form].

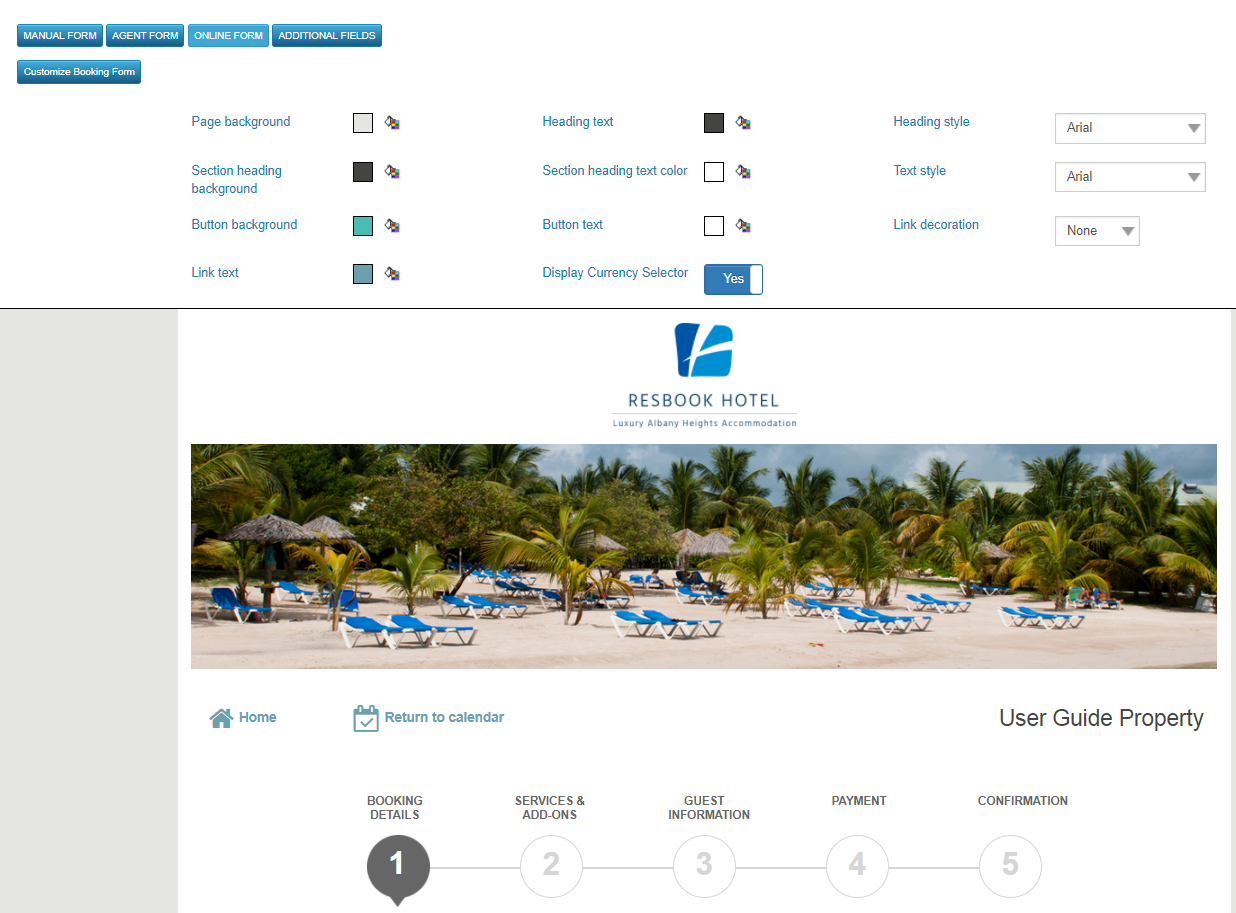
A page like this should then appear:

At the top, you will see a panel with colour and font options, as well as a template of how your form appears below.
- For options regarding colour selection, you will see a tiny box with the current colour selected in it; as well as a little paint bucket button next to it. This is your colour selector and you will be able to pick colours by RBG or hex key. Changes you make to the colour will be instantly visible on the template so you can spend time making sure you are happy with your selections before saving.
- On the right-hand side, there is a small selection of fonts available for you to use.
Once you have chosen your fonts, colours and added your pictures; make sure you [Save Changes]. Your Guest Booking Form is now ready to be used.
Please note:
- If you are having issues loading the Customization settings and sample, try refreshing your browser and click on the [Customize Booking Form] again.
- There is a button at the bottom of the sample template that says [CONTINUE TO PAGE 2]. This button DOES NOT WORK. This is just a template for how the Guest Booking Form will look.
Placing Logo's and Banner Images
If you want images at the top of your Guest Booking Form, go to the Photo Gallery, by clicking on Settings (the gear icon), then select [System Settings] and scroll to find [Photo Gallery].
From the Photo Gallery, you can upload images in both the 'Logo' and 'Banner' gallery types.

