
In this guide we will cover:
- How to crop an image
- What is Aspect Ratio?
- How to rotate an image
- How to adjust an image (brightness, contrast, saturation, exposure, sepia, sharpen)
- How to apply a preset (clarity, her majesty, nostalgia, pinhole, sunrise, vintage)
How to resize an image
-
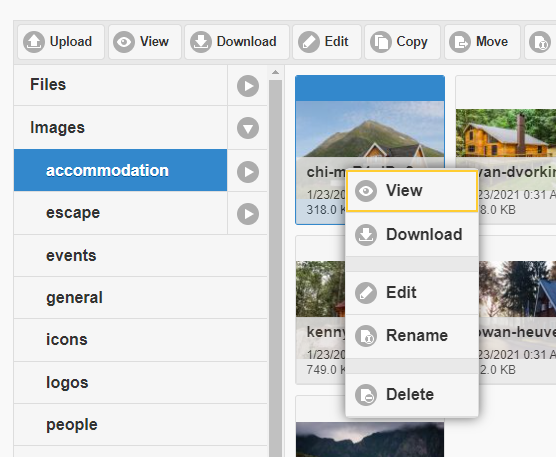
Once you have uploaded an image to File Manager, select an image you would like to work with until it is highlighted blue, then select Edit at the top of the window. You can also right click on an image to display a list of drop down options, where you can also select Edit.
- This will open a screen with a range of options to edit the image. Select Resize, and you will see the details of the selected image, showing the pixel size e.g.: 4272 (height)x 2848 (width).

- The pixel sizes are editable fields allowing you to enter the preferred height and width that you would like to change the image to. This edit option allows you to resize the pixel dimensions of an image, however you can only make the dimensions smaller.
- Use the Hero Banner pixel size for an internal page, let's change the pixel dimensions to 1920 x 1080 px.
- Leaving the Keep Aspect Ratio tick box checked, means that even though we are editing the pixel size of the image, we are preserving the relationship between the width and height of an image to help avoid it appearing stretched, squished, cropped, or image content appearing 'cut-off' which is sometimes seen as on screens as gaps or black bars. You can read more about how to find image dimensions and work out an images Aspect Ratio below.
- You'll see that when you select Apply, that the pixel width updates to 1620 px. This preserves to display of the image when you resize it to smaller dimensions.

- At the top-right of the window, select the Save button. You will now be presented with an option to overwrite the original image with this new version. It is recommended that you unselect this tick box, and rename the file e.g. RESIZEDchi-m-R1uiDu8vBh0-unsplash


- Select OK, and you will be taken back to File Manager where your resized image is saved and ready to be selected for your content.
How to crop an image
- Once you have uploaded an image to File Manager, select an image you would like to work with until it is highlighted blue, then select Edit at the top of the window. You can also right click on an image to display a list of drop down options, where you can also select Edit.
- This will open a screen with a range of options to edit the image. Select Crop, and you will see your selected image with a square overlay.

- The overlay is able to positioned anywhere on the image, but can only be resized from the bottom right corner. You will see that there are pixel dimensions on the overlay as a guide to help you set the new dimensions for the image.
- The original dimensions of the image 4272 (height)x 2848 (width) pixels. You can read more about how to find image dimensions below. Let's use the Hero Banner pixel size for an internal page, and crop this image to the pixel dimensions to 1920 x 1080 px.
- Leaving the Keep Aspect Ratio tick box checked, means that even though we are cutting off parts of the image, we are preserving the relationship between the width and height of an image to help avoid it appearing stretched, squished, cropped, or image content appearing 'cut-off' which is sometimes seen as on screens as gaps or black bars. You can read more about how to find an images Aspect Ratio below.
- You'll see that the closest dimensions I can crop the image to are 1922 px x 1281 px maintaining the Aspect Ratio, and that when you select Apply, cropping this image would result in an image with a lot of detail missing, so in this example it is recommended to use a larger set of dimensions.


- When the Keep Aspect Ratio tick box is not checked, the square overlay becomes freeform allowing you adjust the height and width of the image to any pixel size.

- Once you have made your changes, select Apply, to see what the saved result will look like. Select the Save button at the top of the window and you will now be presented with an option to overwrite the original image with this new version. It is recommended that you unselect this tick box, and rename the file e.g. CROPPEDchi-m-R1uiDu8vBh0-unsplash.


- Select OK, and you will be taken back to File Manager where your resized image is saved and ready to be selected for your content.
What is Aspect Ratio?
Aspect ratio is the proportional relationship between the width and height of an image. The 16:9 ratio is the preferred aspect ratio for images to use when creating a Hero, Page or Gallery Banner in the CMS.
This helps to preserve the image when editing and avoid it appearing stretched, squished, cropped, or image content appearing 'cut-off' which is sometimes seen as on screens as gaps or black bars.
Within the Display settings of your computer, you may have seen an option to set the display resolution for your screen, with options for:


Common Ratios:
-
1:1 (1080px x1080px): Square
-
4:3 (19200px x1440px): Standard monitors, older photos
-
16:9 (1920px x 1080px): Widescreen, HD video, This is also the pixel size of the Hero Banner for the Home Page
- 3:2 (1080px x 1920px): Instagram Stories & Reels
-
1920x1080: 1920/120 = 16. 1080/120 = 9. W:H = 16:9.
How to rotate an image
- Once you have uploaded an image to File Manager, select an image you would like to work with until it is highlighted blue, then select Edit at the top of the window. You can also right click on an image to display a list of drop down options, where you can also select Edit.
- This will open a screen with a range of options to edit the image. Select Rotate, and you will see your selected image with options to rotate the 90° to the left or right. You can use each of the rotation buttons to flip the image to flip the image up to 360°.


- Once you have made your changes, select the Save button at the top of the window and you will now be presented with an option to overwrite the original image with this new version. It is recommended that you unselect this tick box, and rename the file e.g. ROTATEDchi-m-R1uiDu8vBh0-unsplash.


- Select OK, and you will be taken back to File Manager where your resized image is saved and ready to be selected for your content.
How to adjust an image
- Once you have uploaded an image to File Manager, select an image you would like to work with until it is highlighted blue, then select Edit at the top of the window. You can also right click on an image to display a list of drop down options, where you can also select Edit.
- This will open a screen with a range of options to edit the image. Select Adjust, and you will see options to toggle the level of brightness, contrast, saturation, exposure, sepia, sharpen, from -100 - 100. You can also enter numbers from -100 - 100 in the numerical field.
Brightness

Contrast

Saturation

Exposure

Sepia

Sharpen

- Once you have made your changes, select the Save button at the top of the window and you will now be presented with an option to overwrite the original image with this new version. It is recommended that you unselect this tick box, and rename the file e.g. ADJUSTEDchi-m-R1uiDu8vBh0-unsplash.
- Select OK, and you will be taken back to File Manager where your resized image is saved and ready to be selected for your content.
How to apply a preset
- Once you have uploaded an image to File Manager, select an image you would like to work with until it is highlighted blue, then select Edit at the top of the window. You can also right click on an image to display a list of drop down options, where you can also select Edit.
- This will open a screen with a range of options to edit the image. Select Presets, and you will see a range of presets or filters you can apply to an image, with options for:


- Once you have made your changes, select the Save button at the top of the window and you will now be presented with an option to overwrite the original image with this new version. It is recommended that you unselect this tick box, and rename the file e.g. PRESETSchi-m-R1uiDu8vBh0-unsplash.


- Select OK, and you will be taken back to File Manager where your resized image is saved and ready to be selected for your content.
💡 Things to Remember:
- Overwrite File: It is recommended that you unselect this tick box, create another version of the image by renaming it e.g. RESIZEDchi-m-R1uiDu8vBh0-unsplash
- Resize: This edit option allows you to resize the pixel dimensions of an image, however you can only make the dimensions smaller.
- Image sizes: Ahead of resizing or cropping an image, it is important to know the dimensions of the content you are using the image for. View our Guides on Hero Banners, Quicklinks and Highlights for more details.
- At any time should you wish to discard your changes and return to File Manager, select the arrow in the top left-hand side and click OK.
- You can combine options within the Edit window to create a unique image. You can return to the original image at any time by selecting the Reset button at the top right of the page.