
In this guide we'll cover:
What is a Blog?
Blogs are a great way to update visitors to your website on travel tips, media releases, share more about your business, make it more interactive for users, share guest contributor content, educate people about your points of difference, and help to provide an insight into your business and its voice.
It's also a method you can use as part of your marketing strategy to rank higher in search results organically by adding keywords from keyword research into your blog content.
What's the difference between a Blog Post and creating General Page content?
While both are great ways to share content, they serve different purposes.
The main benefit of publishing a Blog Post is that the posts have a creation date that will display on each post. This means that on the Blogs Landing Page you will see a feed of posts from most recent to least recent. By having posts that are dated, it tells visitors to your website that your content is alive and current, and your business is staying up to date. Versus General Page content which doesn't display any time stamps as to when it has been published.
Creating Blog Posts is one way to drive traffic organically to your website and increase your websites ranking in search engine results. So, the more blog content your website has, the more content the search engines have to crawl and index. This means that search engines can easily recognise that your website is a resource of fresh information for people to access.
The Blog Module
Blogs are a great example of how a module works, where content is are created within one section of a website and can then be selected to display on a General Page.
A Blog Landing Page is normally created within the General section of the CMS, under the Pages menu item, as a General page.

In the example above, the Blogs Landing Page has been set as a Child Page, with the About set as the Parent of this page.
Published Blog Posts will display on the Blogs Landing Page (a General Page) when a rank or number has been assigned against the Blogs module within the modules tab of this General Page.

How to create a Blog Post
- Login to the CMS using your Username and Password, the navigate to the Blog menu, then select Posts.

- You'll see that there is already a list of Blog Posts that have been created. You can either click on existing Blog Post to edit it or click + New button at the top of the page to create a new Blog Post.
- Once the Blog Posts editor is open you will need to complete fields within the Settings tab for:
- Fill in the following fields in the Details Tab:
- Heading: This is the name of the Post that will appear on the Quicklink style tile on the Blogs Landing Page, and as the title of the Blog on the standalone Detail page with its own URL.
- URL: The URL is automatically created based on your Heading. You can leave this field blank as the URL will automatically be created when you enter text in the Heading field. When you save your changes and exit out of the page, and then click back into the Blog Post, you will see that the URL field has populated with the Heading name in lowercase letters and using hyphens to replace any spaces between words. When entering text in this field, please ensure that you use all lowercase letters and where there are spaces between words that you use a hyphen (-) instead of a space. Please note that the URL field, like File Manager, does not like anything other than plain text, so the use of words with macrons, apostrophes or symbols that are part of the Heading field should not be included e.g.: Dave's Taupō Trips & Tramps will display a 404 page on the front end. If you publish a URL that features one of these special characters, you'll see that the URL will display the text differently:

If you do need to update a URL that is already published and live on the front end, please ensure that a redirect is set up for the old URL. You can read more how to create, edit and remove redirects in our Guide to Creating 301 Redirects. - Author: This automatically pulls through the names of the Users that have a login created within the CMS. If you want to update the name from an employee's name to something more generic like the business name, please see our guide on How to create a new NetZone CMS user and set User Permissions.
- Posted On: Select this field to display a calendar where you can set a date that the Blog Post was published. Your blog posts will rank according to date from newest to oldest, so newer Blog Posts will appear at the top of the first page.
- Is Featured: In this field you can tick a checkbox to show Quicklink style tiles of all Blog Posts you have set as Is Featured within a carousel. The carousel can be set to display on a General Page when the Blog module has a rank set within the Modules tab. We'll cover this in more detail in the section below on The Blog 'Carousel'.
- Hero Banner: This is the image or set of images / video that will display at the very top of a Blog Post, on the full page that has its own URL. You will first need to create this within the Photos > Banner menu item, outside of the Blog Module. Once the Hero Banner has been created, it is then available to be selected from this drop-down field. This is not a compulsory field.
- Image: In this field you will select a single image that will populate the Quicklink style tile on the Blog Landing Page and Blog 'Carousel'.
- Image Alt Text: A great way to support search by adding a brief description of what appears in the image you selected in the Image field. Alt text (alternative text) describes an image on a page, helps visually impaired people understand what the image shows so it is good for accessibility, helps search engine bots understand image contents, and appears on a page when the image fails to load.
- Introduction: The text that appears on the Quicklink style tile on the Blog Landing Page. This is limited to 250 characters (including spaces), so it should be short and sharp to encourage a user to click through to the full-page Blog Post.
-
- Short Description: This is the text that appears under the Heading on a Blog or News Story Detail Page (the full page that has its own URL). This is limited to 80 characters.

- Short Description: This is the text that appears under the Heading on a Blog or News Story Detail Page (the full page that has its own URL). This is limited to 80 characters.
- Select the Content tab where you will add the contents of the Blog Post using a Rich text Editor (RTE). Here you have options to:
- Add new row
 with columns
  : Select the arrow in the drop-down field and choose the number of columns that you would like to display content on the page. You can select up to four columns to display on a page. For most pages, you will use a row with 1 column. When selecting 1 column, and then
  this will display the Rich Text Editor text as a single row to add content. You can add multiple rows of columns to a page.

- Add new row
- Next, select the Categories tab to set the topic or category that the Blog Post best fits. You can set a single, or multiple Categories on a Blog Post.

- Now select the SEO tab. It is important to set these fields within this tab to help support the Blog Post appearing in search results on search engines, as well as populate the tabs that display in your browser, and will display when you share a link to a page. Here you'll complete fields for:
- Meta Titles: This is the title of your Blog Post as it appears in search engine results. It is a free text field and is limited to 65 characters, including spaces. The naming convention that has been used across all Pages is as follows: Child Page | News Story or Blog Heading | Your Business Name e.g.: Blog | Blog Post 01 | Tomahawk
- Meta Description: This is a short summary of the details of your Page as it appears in search engine results. It is a free text field and is limited to 320 characters, including spaces. It should be unique from the introduction field in the Settings tabs, with best practice incorporating keywords from keyword research.
-
- OG Title: This is the title of your Blog or News Story when a link is shared on social media platforms such as facebook. It is a free text field and is limited to 70 characters, including spaces. The Meta Title can be used in this field.
- OG Image: This is the thumbnail image of your Blog or News Story when a link is shared on social media platforms such as facebook. It is best practice to use the same image that is used in the Hero Banner so that the user is met with the same image when they click through to view the page.
- OG Description: This is a short summary of the content of your Blog or News Story when a link is shared on social media platforms such as facebook. It is a free text field and is limited to 320 characters, including spaces. It is recommended to keep this text different from both the Introduction text from the Settings tab, and the Meta Description.

5. Our final tab is the Quicklinks tab. Quicklinks help a visitor who has reached the bottom of the Page to continue their journey on the website. When presented with a set of Quicklinks at the bottom of the Blog Detail Page it encourages the visitor to stay on the site and continue browsing related content. Quicklinks are created within a separate Menu item within the CMS and once published will populate within the Choose Quicklinks section with all available/published Quicklinks. You can then select the Quicklinks you want to display on the page, as well as what style you would like them to display. You can read more about how to create Quicklinks in our Guide to Quicklinks. - 6. Save: When all fields have been completed, select the Save button at the top of the page and you will be directed back to the list of all Blog Posts where your Post will show that it has been saved as a draft or with a status of HIDDEN (orange).
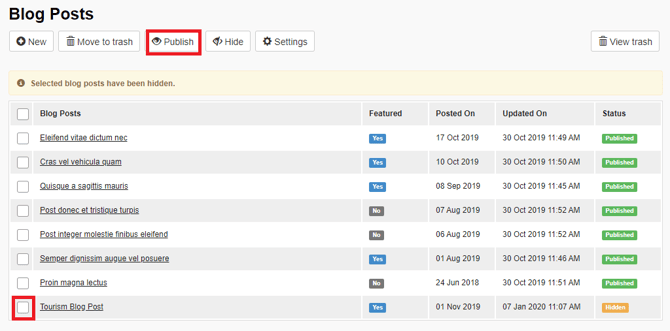
- Publish: Scroll to the bottom of the Blog Posts page to locate your Post that is HIDDEN / not yet published. Tick the checkbox for the Post, then select Publish. This will now show in the list with a green status of PUBLISHED and now be visible on the Blogs Landing Page.
The Blog 'Carousel'


The Modules tab within a General Page allows you to set a rank against the Blog field that will set the Blog 'Carousel' to display on the Page. When more than three Blog Posts have the Is Featured checkbox ticked, the carousel will change from a static display to showing navigation arrows to allow a visitor to progress through these Quicklink Style Tiles. Clicking anywhere within the Quicklink Style Tiles will navigate a visitor to the Blog Details Page with its own URL.
- Login to the CMS using your Username and Password, the navigate to the Blog menu, then select Posts.
- At the top of the page you will see a button for Settings.

- This section within the Blog Module allows you to set the text that will appear on the Blogs 'Carousel'. Here you will need to complete fields for:
- Heading: In this field you will add a heading that will head up the Carousel content. In the screen shot below, this has been set as Featured Posts.
- Short Description: In this field you will add a brief description which will display underneath the Heading e.g.: Discover more about places to visit, things to see & do and more.
- Button Label: In this field you will set text that will populate the CTA button that sits on the top right of the Carousel content. In the screen shot above, this has been set as View All Posts.
- Destination Page: Select from a drop-down menu an internal page that a user will be directed to should they click on the CTA Button e.g.: Blogs.

- Save: When all fields have been completed, select the Save button at the top of the page and you will be directed back to the list of all Blog Posts. The final step is to select the Blog Carousel to display on a General Page.
- Navigate to the General menu, then select Pages, and select the name of a Page that you'd like to work with to open it.
- Select the Modules tab, and in the Blog field, add a number or rank to set the order that you would like to display this content. In the example below you'll see that the Blog Module field has been set with a rank of 1, meaning that that Blog 'Carousel' will display after the Heading and Introduction content (from the Content tab), and before the Highlights content that has been set with a rank of 2.


- Save: When all fields have been completed, select the Save button at the top of the page and you will be directed back to the Pages menu. The final step is to select the Blog Carousel to display on a General Page.
- Always check the website's front end once you have saved your changes to make sure the Blog 'Carousel' appears and when the CTA button or any of the Quicklink Style Tiles are clicked, navigates you to the correct page.
💡 Things to Remember:
-
You will need to have created a General Page, as a Child or Parent Page within the CMS, that will serve as the Blogs Landing Page. Within the Modules tab of this General Page, you will need to set a rank against the Blogs module to display the content you have created within the Blogs Module.
- When copying text from a source such as a Word or PDF document, you will need to copy the content, then right click to select Paste as plain text to paste within the field. This means that the font style will not be copied across to your Blog Post from the source and publish on the front end.
- The Author fields is populated from the names of the Users that have a login created within the CMS. If you want to update the name from an employee's name to something more generic like the business name, you can do this within the Users section of the CMS, within the General Setting menu item.